It is very important to make sure that every single component of your application is functioning properly. You can achieve this goal by using unit testing within your testing environment. Want to implement unit testing on Java applications? JUnit testing is one of the most efficient ways of completing this step.
Not familiar with JUnit? Don’t worry! We are here for you. Our article will help you dive deep into the world of JUnit testing while outlining its key concepts, advantages, and all the best practices. Our primary goal for this article is to help you improve the quality of your test and also increase the quality of your application in the long run.
Table of Contents
What is JUnit Testing
Before we start going into all the complex details, we must begin our analysis by understanding what is JUnit and why should you bother about it. Under the hood, it is an open-source framework for unit testing in Java applications. The architecture is part of the Xunit family of testing frameworks. So, it provides annotations, assertions, and tools to automate and simplify the overall testing cycle.
While using JUnit, you will be able to utilize the following benefits in the testing process:
- You can test individual units of the code, including all the separate classes and methods, in an isolated testing environment.
- You will also be able to verify the code’s correctness and the expected behavior during the testing cycle and ensure that it aligns with your previous expectations.
- Finally, JUnit testing will help you automate the regression testing processes so that you can prevent future errors when changes are introduced within the source code of the application.
In a single line, the simple annotations, powerful assertions, and integrations of JUnit with various popular tools have made it one of the most important components of the modern test-driven development practices.
Why JUnit
A question might arise in your mind, with so many options in the market, “Why should we use JUnit for Java-based applications?” To justify this point, we have mentioned some of the most important features that you can use exclusively with JUnit:
- It is a very lightweight application and also easy to use at the same time. You will have access to simple methods like @Test, @BeforeEach, and @AfterEach to improve the test creation process.
- It is very easy to integrate JUnit with build tools like Maven and Gradle. At the same time, you can also use it with continuous integration and continuous deployment tools like Jenkins.
- By using JUnit to execute automated unit testing, you can ensure that the overall code infrastructure is repeatable and also consistent even after multiple testing runs.
- Finally, JUnit helps improve the extensibility of your testing practices by supporting additional tools like Mockito for mocking dependencies.
Benefits of Unit Testing With JUnit
To further justify our choice of JUnit for automated unit testing for Java applications, we have created a list of some of the major advantages that you can enjoy with this integration:
- It helps to improve the code quality by identifying issues earlier in the development cycle. This approach also helps you to reduce the bugs while improving the overall code reliability in your testing infrastructure.
- By using JUnit for automated unit testing, you can speed up the deployment cycles as you can make the changes confidently, knowing regressions are less likely to occur during the testing process.
- Unit tests will help you document the intended behavior of a class or method. This documentation will serve as a form of live database to keep track of your application’s expected behavior and behavior in real scenarios.
- By fixing bugs at the earlier phases of the development cycle, you can reduce the expenses related to this process. You can also remove the possibility of serious harm to the application source code if it is done after deployment.
Best Practices for JUnit Testing
To assist all the new developers and testers, we have created a list of some of the best practices for genetic testing. These practices have been carefully created to not only help you in the testing process but also improve the quality of the application along the way:
1. Adopt a Consistent Naming Convention
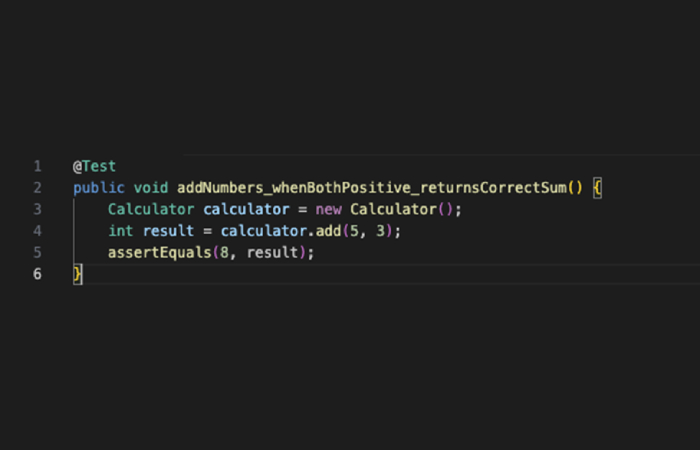
It is very important for you to name your testing methods clearly and consistently. This practice will help you to understand the purpose of the testing and also debug the failures that might arise during the test execution process. We suggest the testers to use descriptive names to indicate the scenario that is currently being tested. For example, you can name an element as follows:
methodName_stateUnderTest_expectedBehavior
To further help you understand the best practices related to the naming of an element, we have mentioned a code snippet that uses these naming conventions:

2. Write Independent and Isolated Tests
We strongly advised the testers to create such unit test cases which are independent and will test only a single unit of code. This is because if you create tests that depend on other tests or shared status it will produce inconsistent results in the long run.
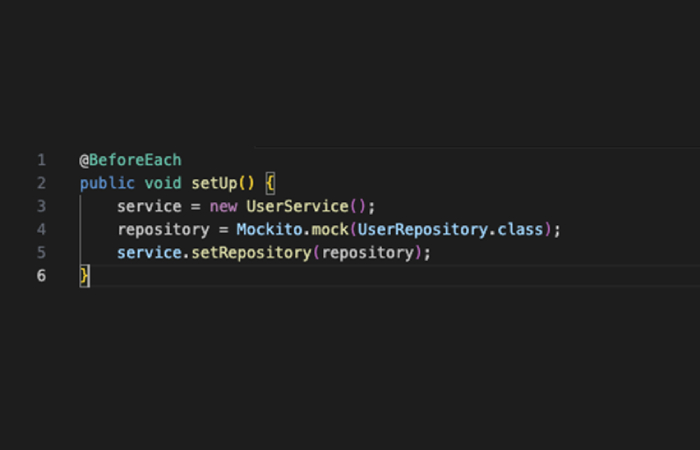
So, you should not only avoid dependencies between multiple test cases but also reset the state of each test using “@BeforeEach” and “@AfterEach” methods.
We also suggest the testers to use mocking libraries like Mockito to isolate the testing dependencies and ensure that they do not hamper the functioning of each other. To further help you understand this concept, we have mentioned a sample code snippet that elaborates on this process:

3. Integration With Cloud Platforms
You can improve the efficiency of your unit testing processes by integrating various cloud platforms. This is because these platforms provide access to various real devices, browsers, and operating systems through a remote device farm. Let us improve our understanding of this process by using LambdaTest as our reference point.
LambdaTest, an AI-powered test orchestration and execution platform, lets you perform manual and automation testing at scale with over 3000 real devices, browsers, and OS combinations. LambdaTest will also provide access to your chosen legacy web browser online, like Internet Explorer, to further improve the scope of your testing process.
We have also attached a sample code snippet of executing automated unit testing with LambdaTest and JUnit.

4. Use Meaningful Assertions
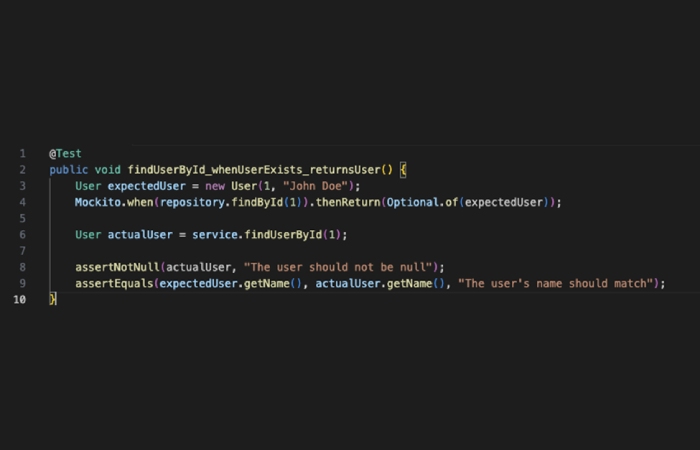
We advise the testers to use meaningful assertions that will help them verify the actual output and also match it with the expected output. You must ensure that these assertions are clear and meaningful so that they help you improve the readability of the entire application testing structure.
You can use various methods like assertEquals, assertTrue, assertNotNull, etc., where appropriate. During this process, you should also avoid overly generic assertions as they might be duplicated in other elements of the app. Finally you must use assert messages that will help you describe the purpose of the assertion.
The following code snippet will help you understand the implementation of meaningful assertions while running JUnit testing:

5. Test Edge Cases
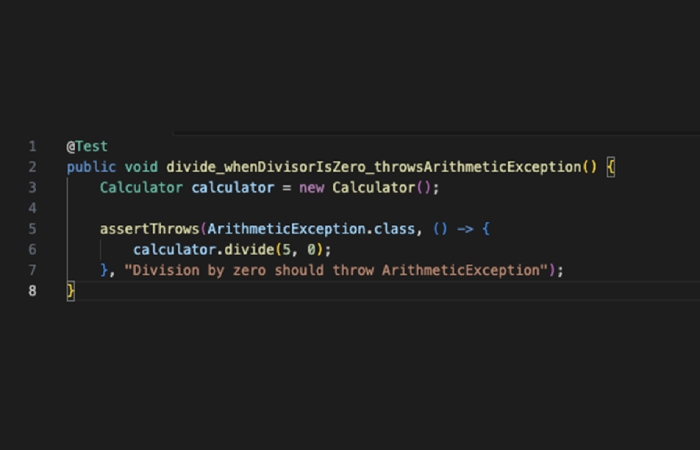
One of the modern requirements for unit testing is that it must include edge cases like null inputs, empty collections, invalid values, and boundary conditions. These requirements will help you understand how the application acts when it is exposed to various unexpected conditions.
While implementing edge testing, you must ensure that these testing processes cover both positive and negative scenarios. You must also implement the test handling exceptions gracefully to ensure a smooth testing process.
The following code snippet will help you understand how to implement this practice in your testing environment:

6. Keep Tests Fast and Lightweight
We advised the testers to ensure that all the unit tests are fast to execute. This is because slow tests will deter the developers from running the test frequently and leave various areas of the application untested.
To implement this practice, you must avoid using real databases or external systems that will increase the overhead on the system. Instead, you should use in-memory databases like H2s for dependencies that will require external inputs from the user.
7. Utilize Parameterized Tests
We strongly recommend the testers to use parameterized tests as it will allow them to run the same test with multiple sets of input data. To implement parameterized tests, you can use various methods like @ParameterizedTest with @ValueSource, @CsvSource, or @MethodSource to provide inputs.
The following code snippet will help you understand how to implement parameterized tests while using JUnit testing:

Common Mistakes To Avoid In JUnit Testing
Finally, let us go through some of the common mistakes that you might make while executing JUnit testing. We have chosen those mistakes that are most common to appear but will have the most devastating effect on the overall functioning of the testing cycle:
- Many testers often make the mistake of testing too much logic using a single test. This process not only increases the complexity of the testing process but can also lead to various errors. The most effective practice is to verify a single behavior using one test.
- Various testers often fail to test the edge cases while running JUnit testing. This is a very bad practice, as if you only focus on happy path leads, you will miss various critical issues that might be underlying within the source code of the architecture.
- It is very important to always investigate and resolve failing tests. If you ignore them, they can turn into serious concerns after the application has been deployed to your end customers.
- We advise the testers to not hardcode the test data. Instead, you must use constraints or parameterized tests to ensure that you can not only improve the maintainability of the test suite but also improve its stability.
- Finally, various testers often don’t use mocks in the actual testing phase. However, you must use mocks to isolate dependencies and avoid chances of fragile test results.
The Bottom Line
Based on all the factors that we have put forward in this article, we can safely say that JUnit Testing is a very powerful tool for ensuring code reliability. However, you must remember that to utilize its full potential, you must apply all the best practices that we have mentioned in this article.
By writing clear, isolated, and efficient tests, you can build robust apps and prevent errors at the earlier phases of the development cycle. Moreover, these practices will also help your team to achieve higher code quality for faster delivery and greater confidence in the overall software performance.

